192.168.1.1Admin
192.168.10.1 is a private IP address used to access your router’s admin panel. Through this gateway you can change Wi-Fi passwords manage connected devices and update security settings. It is mostly used by router brands like D-Link TP-Link and Huawei to help users control their home or office network with simple browser access.
192.168.1.1 is a private IP address that serves as the gateway to your router’s admin control panel. It’s commonly used by popular router brands such as TP-Link, D-Link, Netgear, and Linksys. When you enter http://192.168.1.1 in your browser’s address bar, it opens the router’s login page where you can manage your entire network.
Through this panel, users can change Wi-Fi names and passwords, set up new connections, manage connected devices, and enhance network security. This IP address is part of a private range defined by the Internet Assigned Numbers Authority (IANA), which means it’s not accessible from outside your home or office network.
For first-time users, the default username and password are usually “admin.” After logging in, it’s strongly recommended to change these details to keep your network secure. If 192.168.1.1 doesn’t open, your router might use an alternative IP like 192.168.0.1 or 10.0.0.1.
How to Login to 192.168.1.1 (Step-by-Step)
Here’s the clean, user-friendly way to sign in. Make sure you’re on your own network and have the router’s label or manual handy. Follow these steps carefully to avoid lockouts and get into the admin panel smoothly.
- Connect to Router: Make sure your device is connected to the router’s Wi-Fi or by Ethernet cable for a stable connection.
- Open Browser: Launch Chrome, Firefox, or Safari and go to the address bar at the top.
- Type IP Address: Enter http://192.168.1.1 carefully and press Enter. This will open your router’s login page.
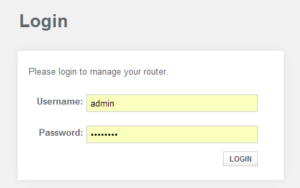
- Enter Login Details: Type the default username and password (usually admin/admin) or your custom credentials.
- Access Admin Panel: Click Login to enter the control panel where you can manage all router settings.
- Save Changes: After making adjustments, click Apply or Save and restart your router for the changes to take effect.
How to Find Your Router’s IP Address
Finding your router’s IP address helps you access its login page for managing Wi-Fi and settings. Follow these simple steps below to locate it easily on any device:
- Connect to Router: Make sure your phone or computer is connected to the router’s Wi-Fi network.
- Open Network Settings: Go to your device’s network or internet settings section.
- Check Connection Details: Select your connected Wi-Fi network and open its properties or details.
- Find Default Gateway: Look for a line named Default Gateway or Router IP Address — that’s your router’s IP.
- Use Command Prompt (Windows): Type ipconfig and press Enter; the IP appears next to “Default Gateway.”
- Use Safari or Settings (Mac/iPhone): Go to Wi-Fi settings, select your network, and view the router address shown there.
How to Change Router IP Address
Changing your router’s IP address helps improve security and avoid network conflicts. It also lets you customize your local network as you prefer. Here’s how to change it easily on popular router brands:
TP-Link: Open a browser and type http://192.168.1.1 or http://192.168.0.1. Log in using your admin credentials. Go to Advanced Settings > Network > LAN. In the IP Address field, replace the old address with your desired one, such as 192.168.10.1, then click Save. The router will reboot to apply the new settings.
D-Link: Type 192.168.0.1 in your browser and log in with your admin username and password. Go to Setup > Network Settings, and find the Router IP Address section. Enter the new IP you want, save the changes, and restart the router to activate the update.
Netgear: Visit 192.168.1.1 or routerlogin.net and sign in using your login details. Navigate to Advanced > Setup > LAN Setup. In the IP Address box, enter a new private IP like 10.0.0.1, click Apply, and the system will reboot.
Default Router Username and Password List
Every router comes with a default username and password that helps you log in to its admin panel for the first time. These credentials are usually printed on the router’s label or mentioned in the user manual. Below is a simple, helpful table showing the most common default login details for popular router brands:
| Router Brand | Default IP Address | Username | Password |
|---|---|---|---|
| TP-Link | 192.168.1.1 | admin | admin |
| D-Link | 192.168.0.1 | admin | admin |
| Netgear | 192.168.1.1 | admin | password |
| Linksys | 192.168.1.1 | admin | admin |
| Tenda | 192.168.0.1 | admin | admin |
| Huawei | 192.168.3.1 | admin | admin |
| Asus | 192.168.1.1 | admin | admin |
| Belkin | 192.168.2.1 | admin | blank (leave empty) |
Note: It’s strongly recommended to change your default username and password after logging in for the first time to protect your Wi-Fi network from unauthorized access.
FAQs
Why can’t I open 192.168.1.1 on my browser?
If the page is not loading, make sure your device is connected to the router’s Wi-Fi network. Also, check that you typed the address correctly — avoid typing 192.168.l.l (with the letter “l”) instead of 192.168.1.1.
What are the default username and password for routers?
Most routers use admin as both username and password. However, it may vary by brand. Always check the router’s back label or manual for the correct default credentials.
How do I reset my router if I forget the password?
Find the small RESET button on your router, usually at the back. Press and hold it for about 10–15 seconds using a pin or paperclip. The router will restart and return to its default settings.
Can I change the router IP address from 192.168.1.1 to another one?
Yes. You can change it through the admin panel under Network > LAN Settings. Enter a new IP address like 192.168.10.1 or 10.0.0.1, then save and restart your router.